5.1. 参考示例
本章节快速介绍用C语言接口开发的多媒体处理及AI算法推理示例的使用。功能示例包括打开旭日X3派的mipi摄像头、视频流编解码、HDMI显示图像、调用旭日X3派的BPU进行AI算法推理。
5.1.1. 安装
你可以通过以下命令安装旭日X3派的C语言开发包:
sudo apt update
sudo apt install hobot-sp-cdev
安装成功后,对应的头文件会安装在 /usr/include 目录下, 库文件会安装在 /usr/lib 目录下, 示例程序安装在 /app/media_cdev 和 /app/bpu_cdev 目录下。
sunrise@ubuntu:~$ ls /usr/include/sp_*
/usr/include/sp_bpu.h  /usr/include/sp_codec.h  /usr/include/sp_display.h  /usr/include/sp_sys.h  /usr/include/sp_vio.h

sunrise@ubuntu:~$ ls -l /usr/lib/libspcdev.so /usr/lib/libhb_dnn.so
-rw-r--r-- 1 root root  10280 Oct 31  2022 /usr/lib/libhb_dnn.so
-rw-r--r-- 1 root root 212056 Oct 31  2022 /usr/lib/libspcdev.so

sunrise@ubuntu:/app$ tree bpu_cdev/ media_cdev/ -L 1
bpu_cdev/
├── go.sh
├── include
├── README.md
└── src
media_cdev/
├── decode2display
├── rtsp2display
├── vio2display
├── vio2encoder
└── vps
注意!!!重新开机之后如果找不到摄像头,请执行一次bpu_cdev/go.sh。这个脚本用于复位并启动摄像头
5.1.2. 预览摄像头视频
本示例代码完成打开 mipi 摄像头获取视频数据,通过HDMI实时显示。
环境准备:
1、旭日X3派上电,LED指示绿灯熄灭,用户可以通过远程登录中介绍的其中一种方式连接上设备;
2、连接好旭日X3派支持的mipi摄像头,MIPI摄像头的连接可以参考MIPI摄像头连接教程;
3、通过HDMI线缆连接开发板和显示器
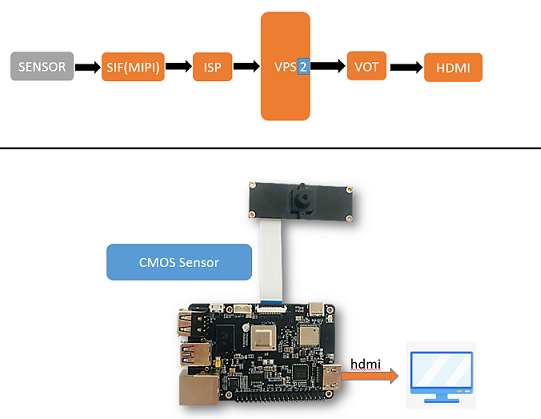
运行方式: 按照以下命令执行程序
sunrise@ubuntu:~$ cd /app/media_cdev/vio2display
sunrise@ubuntu:/app/media_cdev/vio2display$ sudo make
sunrise@ubuntu:/app/media_cdev/vio2display$ sudo ./vio2display
预期效果:
make命令完成程序的编译,./vio2display命令执行程序,程序正确运行后,旭日X3派的HDMI接入的显示器会显示MIPI摄像头拍到的实时画面。
sunrise@ubuntu:/tmp/nfs/sp_cdev/media_cdev/vio2display$ sudo ./vio2display
[sudo] password for sunrise:
disp_w=800, disp_h=480
mipi_w:1920,mipi_h:1080;dst_w:800,dst_h:480;
mipi_w:1920,mipi_h:1080;dst_w:1920,dst_h:1080;
 start linear mode, sensor_name f37, setting_size = 3
sp_open_camera success!
libiar: hb_disp_set_timing done![ 6156.771952] iar_output1_reqbufs.

[ 6156.772663] iar_output_stream.

Press 'q' to Exit !
键盘输入 q + Enter 或者按 CTRL+C 可以结束程序。
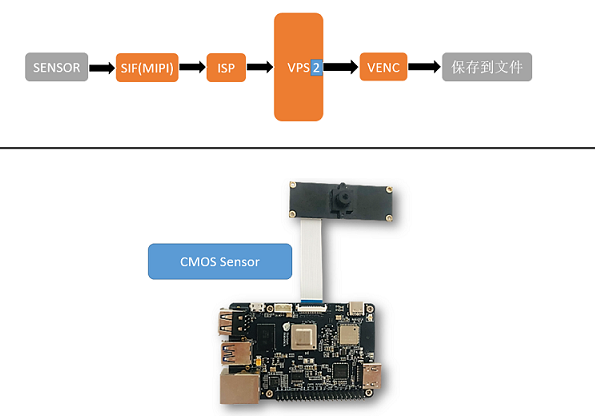
5.1.3. 对摄像头视频编码
本示例代码完成打开 mipi 摄像头获取视频数据,对视频进行编码压缩保存。
环境准备:
1、旭日X3派上电,LED指示绿灯熄灭,用户可以通过远程登录中介绍的其中一种方式连接上设备;
2、连接好旭日X3派支持的mipi摄像头,MIPI摄像头的连接可以参考MIPI摄像头连接教程;
参数配置:
-h: 编码输出视频高度
-w: 编码输出视频宽度
-o: 编码输出路径
sunrise@ubuntu:/app/media_cdev/vio2encoder$ sudo ./vio2encoder
Usage: vio2encoder [OPTION...]
vio2encode sample -- An example of using the camera to record and encode

  -h, --height=height        height of output video
  -o, --output=path          output file path
  -w, --width=width          width of output video
  -?, --help                 Give this help list
      --usage                Give a short usage message

Mandatory or optional arguments to long options are also mandatory or optional
for any corresponding short options.
运行方式: 按照以下命令执行程序
sunrise@ubuntu:~$ cd /app/media_cdev/vio2encoder
sunrise@ubuntu:/app/media_cdev/vio2encoder$ sudo make
sunrise@ubuntu:/app/media_cdev/vio2encoder$ sudo ./vio2encoder -w 1920 -h 1080 -o stream.h264
预期效果:
make命令完成程序的编译,./vio2encoder -w 1920 -h 1080 -o stream.h264命令执行程序,程序正确运行后,在运行目录下会生成宽为1920,高为1080,名字为stream.h264的视频文件 。
sunrise@ubuntu:/tmp/nfs/sp_cdev/media_cdev/vio2encoder$ sudo ./vio2encoder -w 1920 -h 1080 -o stream.h264
Setting VPS channel-2: src_w:1920, src_h:1080; dst_w:1920, dst_h:1080;
Setting VPS channel-1: src_w:1920, src_h:1080; dst_w:1920, dst_h:1080;
 start linear mode, sensor_name f37, setting_size = 3
sp_open_camera success!
sp_start_encode success!
sp_module_bind(vio -> encoder) success!
当程序运行中时,按下CTRL+C组合键可以结束应用。
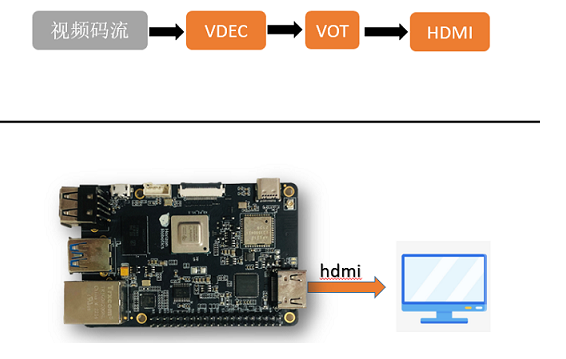
5.1.4. 视频流解码
本示例实现对编码压缩后的视频解码,通过HDMI显示视频图像。
环境准备:
1、旭日X3派上电,LED指示绿灯熄灭,用户可以通过远程登录中介绍的其中一种方式连接上设备;
2、通过HDMI线缆连接开发板和显示器;
3、准备视频编码文件
stream.h264作为输入。
参数配置:
-h: 待解码视频的高度
-w: 待解码视频的宽度
-i: 待解码视频路径
sunrise@ubuntu:/app/media_cdev/decode2display$ sudo ./decoder2display
Usage: decoder2display [OPTION...]
decode2display sample -- An example of streaming video decoding to the display

  -h, --height=height        height of input video
  -i, --input=path           input video path
  -w, --width=width          width of input video
  -?, --help                 Give this help list
      --usage                Give a short usage message

Mandatory or optional arguments to long options are also mandatory or optional
for any corresponding short options.
运行方式: 按照以下命令执行程序
sunrise@ubuntu:~$ cd /app/media_cdev/decode2display
sunrise@ubuntu:/app/media_cdev/decode2display$ sudo make
sunrise@ubuntu:/app/media_cdev/decode2display$ sudo ./decoder2display -w 1920 -h 1080 -i stream.h264
预期效果:
make命令完成程序的编译,./decoder2display -w 1920 -h 1080 -i stream.h264命令执行程序,程序正确运行后,旭日X3派的HDMI接口会显示解码后的视频
sunrise@ubuntu:/app/media_cdev/decode2display$ sudo./decoder2display -w 1920 -h 1080 -i stream.h264
disp_w=1024, disp_h=600
[x3_av_open_stream]:[380]:probesize: 5000000
sp_start_decode success!
libiar: hb_disp_set_timing done!
sp_start_display success!
sp_open_vps success!
当程序运行中时,按下CTRL+C组合键可以结束应用。
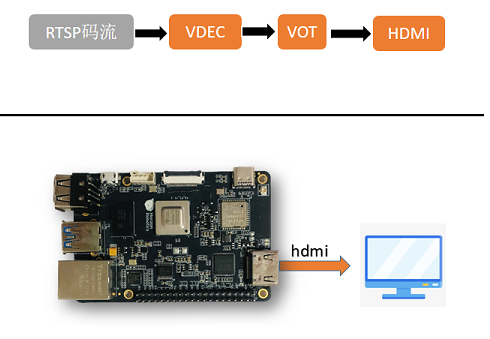
5.1.5. RTSP拉流解码
本示例实现拉取rtsp码流之后进行解码,并通过HDMI显示视频图像。
环境准备:
1、旭日X3派上电,LED指示绿灯熄灭,用户可以通过远程登录中介绍的其中一种方式连接上设备;
2、通过HDMI线缆连接开发板和显示器;
3、准备
rtsp码流作为输入。
参数配置:
-i: rtsp码流地址
-t: 传输类型,可选tcp/udp
sunrise@ubuntu:/app/media_cdev/rtsp2display$ sudo ./rtsp2display
Usage: rtsp2display [OPTION...]
decode2display sample -- An example of streaming video decoding to the display

  -i, --input=path           rtsp url
  -t, --type=type            tcp or udp
  -?, --help                 Give this help list
      --usage                Give a short usage message

Mandatory or optional arguments to long options are also mandatory or optional
for any corresponding short options.
运行方式: 按照以下命令执行程序
sunrise@ubuntu:~$ cd /app/media_cdev/rtsp2display
sunrise@ubuntu:/app/media_cdev/rtsp2display$ sudo make #可能会打印一些警告信息,无需理会
sunrise@ubuntu:/app/media_cdev/decode2display$ sudo ./rtsp2display -i rtsp://admin:admin123@10.96.32.170:554/0 -t tcp
预期效果:
make命令完成程序的编译,./rtsp2display -i rtsp://admin:admin123@10.96.32.170:554/0 -t tcp命令执行程序,程序正确运行后,旭日X3派的HDMI接口会显示解码后的视频
sunrise@ubuntu:/app/media_cdev/rtsp2display$ sudo ./rtsp2display -i rtsp://admin:admin123@10.96.32.170:554/0 -t tcp
avformat_open_input ok!
avformat_find_stream_info ok!
Input #0, rtsp, from 'rtsp://admin:admin123@10.96.32.170:554/0':
  Metadata:
    title           : h264.mp4
  Duration: N/A, start: 0.040000, bitrate: N/A
    Stream #0:0: Video: h264 (Main), yuvj420p(pc, bt709, progressive), 1920x1080, 25 tbr, 90k tbn, 180k tbc
    Stream #0:1: Audio: pcm_mulaw, 8000 Hz, 1 channels, s16, 64 kb/s
Input #1, rtsp, from 'rtsp://admin:admin123@10.96.32.170:554/0':
  Metadata:
    title           : h264.mp4
  Duration: N/A, start: 0.040000, bitrate: N/A
    Stream #1:0: Video: h264 (Main), yuvj420p(pc, bt709, progressive), 1920x1080, 25 tbr, 90k tbn, 180k tbc
    Stream #1:1: Audio: pcm_mulaw, 8000 Hz, 1 channels, s16, 64 kb/s
av_dump_format ok!
rtsp_w:1920,rtsp_h:1080
display_w:1024,dispaly_h:600
libiar: hb_disp_set_timing done!
sp_open_vps success!
当程序运行中时,按下CTRL+C组合键可以结束应用。
注意事项:
使用UDP协议传输码流时,因为丢包原因可能偶现花屏现象,如果对此有要求,请切换成TCP协议传输。
5.1.6. VPS缩放示例
本示例实现VPS缩放,输入数据来源可以是本地视频流也可以是NV12图片
环境准备:
1、旭日X3派上电,LED指示绿灯熄灭,用户可以通过远程登录中介绍的其中一种方式连接上设备;
2、通过HDMI线缆连接开发板和显示器;
3、准备本地视频流或者NV12图片作为输入
参数配置:
-i: 待操作的文件路径
--iheight: 输入高度
--iwidth: 输入宽度
-m: 输入模式,1:视频流;2:NV12图片
-o: 输出路径
--oheight: 输出高度
--width: 输出宽度
--skip:(可选)对于视频流输入,调过开头的帧数
sunrise@ubuntu:/app/media_cdev/vps$ ./vps
Usage: vps [OPTION...]
vps sample -- An example of using a vps interface

  -i, --input=path           input file path
      --iheight=height       input height
      --iwidth=width         input width
  -m, --mode=mode            input mode: 1:stream;2:file
  -o, --output=path          output file path
      --oheight=height       output height
      --owidth=width         output width
      --skip=skip            skip frame
  -?, --help                 Give this help list
      --usage                Give a short usage message

Mandatory or optional arguments to long options are also mandatory or optional
for any corresponding short options.
运行方式: 按照以下命令执行程序
sunrise@ubuntu:~$ cd /app/media_cdev/vps
sunrise@ubuntu:/app/media_cdev/vps$ sudo make
sunrise@ubuntu:/app/media_cdev/decode2display$ sudo ./vps -m 1 -i stream.h264 -o output.yuv --iheight 1080 --iwidth 1920 --oheight 720 --owidth 1280
预期效果:
make命令完成程序的编译,./vps -m 1 -i stream.h264 -o output.yuv --iheight 1080 --iwidth 1920 --oheight 720 --owidth 1280命令执行程序,程序正确运行后,处理好的图片将被保存为output.yuv。
sunrise@ubuntu:/app/media_cdev/vps$ sudo ./vps -m 1 -i stream.h264 -o output.yuv --iheight 1080 --iwidth 1920 --oheight 720 --ow
idth 1280
[x3_av_open_stream]:[380]:probesize: 5000000
hb_vp_deinit success
当程序运行时,按下CTRL+C组合键可以结束应用。
5.1.7. AI算法-目标检测(Fcos)
本示例使用 Fcos 算法模型实现视频图像中的目标检测。
环境准备:
1.旭日X3派上电,LED指示绿灯熄灭,用户可以通过远程登录中介绍的其中一种方式连接上设备;
2.通过HDMI线缆连接开发板和显示器
3.准备好待检测的视频源
参数配置:
-f: 模型的路径
-h: 当模型类型为
fcos时,该项需要设置,为输入视频的高-w: 当模型类型为
fcos时,该项需要设置,为输入视频的宽-i: 当模型类型为
fcos时,该项需要设置,为输入视频的路径-m: 模型类型,目前支持:0:yolov5,1:fcos
sunrise@ubuntu:/app/bpu_cdev/src/bin$ sudo ./sample
Usage: sample [OPTION...]
bpu sample -- An C++ example of using bpu

  -f, --file=modle_file      path of model file
  -h, --video_height=height  height of video
  -i, --input_video=video path   path of video
  -m, --mode=type            0:yolov5;1:fcos
  -w, --video_width=width    width of video
  -?, --help                 Give this help list
      --usage                Give a short usage message

Mandatory or optional arguments to long options are also mandatory or optional
for any corresponding short options.
运行方式: 按照以下命令执行程序
sunrise@ubuntu:~$ cd /app/bpu_cdev/src
sunrise@ubuntu:/app/bpu_cdev/src$ sudo make
sunrise@ubuntu:/app/bpu_cdev/src$ cd bin
sunrise@ubuntu:/app/bpu_cdev/src/bin$ sudo ./sample -f /app/model/basic/fcos_512x512_nv12.bin -m 1 -i 1080p_.h264 -w 1920 -h 1080
预期效果:
make命令完成程序的编译,./sample -f /app/model/basic/fcos_512x512_nv12.bin -m 1 -i 1080p_.h264 -w 1920 -h 1080命令执行程序,程序正确运行后,会有如下打印,显示器上也会有相应的视频和算法检测框显示。
sunrise@ubuntu:/app/bpu_cdev/src/bin$ sudo ./sample -f /app/model/basic/fcos_512x512_nv12.bin -m 1 -i 1080p_.h264 -w 1920 -h 1080
[BPU_PLAT]BPU Platform Version(1.3.1)!
[HBRT] set log level as 0. version = 3.14.5
[DNN] Runtime version = 1.9.7_(3.14.5 HBRT)
Model info:
model_name: fcos_512x512_nv12Input count: 1input[0]: tensorLayout: 2 tensorType: 1 validShape:(1, 3, 512, 512, ), alignedShape:(1, 3, 512, 512, )
Output count: 15Output[0]: tensorLayout: 0 tensorType: 13 validShape:(1, 64, 64, 80, ), alignedShape:(1, 64, 64, 80, )
Output[1]: tensorLayout: 0 tensorType: 13 validShape:(1, 32, 32, 80, ), alignedShape:(1, 32, 32, 80, )
Output[2]: tensorLayout: 0 tensorType: 13 validShape:(1, 16, 16, 80, ), alignedShape:(1, 16, 16, 80, )
Output[3]: tensorLayout: 0 tensorType: 13 validShape:(1, 8, 8, 80, ), alignedShape:(1, 8, 8, 80, )
Output[4]: tensorLayout: 0 tensorType: 13 validShape:(1, 4, 4, 80, ), alignedShape:(1, 4, 4, 80, )
Output[5]: tensorLayout: 0 tensorType: 13 validShape:(1, 64, 64, 4, ), alignedShape:(1, 64, 64, 4, )
Output[6]: tensorLayout: 0 tensorType: 13 validShape:(1, 32, 32, 4, ), alignedShape:(1, 32, 32, 4, )
Output[7]: tensorLayout: 0 tensorType: 13 validShape:(1, 16, 16, 4, ), alignedShape:(1, 16, 16, 4, )
Output[8]: tensorLayout: 0 tensorType: 13 validShape:(1, 8, 8, 4, ), alignedShape:(1, 8, 8, 4, )
Output[9]: tensorLayout: 0 tensorType: 13 validShape:(1, 4, 4, 4, ), alignedShape:(1, 4, 4, 4, )
Output[10]: tensorLayout: 0 tensorType: 13 validShape:(1, 64, 64, 1, ), alignedShape:(1, 64, 64, 1, )
Output[11]: tensorLayout: 0 tensorType: 13 validShape:(1, 32, 32, 1, ), alignedShape:(1, 32, 32, 1, )
Output[12]: tensorLayout: 0 tensorType: 13 validShape:(1, 16, 16, 1, ), alignedShape:(1, 16, 16, 1, )
Output[13]: tensorLayout: 0 tensorType: 13 validShape:(1, 8, 8, 1, ), alignedShape:(1, 8, 8, 1, )
Output[14]: tensorLayout: 0 tensorType: 13 validShape:(1, 4, 4, 1, ), alignedShape:(1, 4, 4, 1, )
libiar: hb_disp_set_timing done!
dispaly init ret = 0
vps open ret = 0
module bind vps & display ret = 0
display start ret = 0
[x3_av_open_stream]:[380]:probesize: 5000000
decode start ret = 0
module bind decoder & vps ret = 0
[ERROR]["vdec"][video/src/vdec_group.c:348] [8870.450264]vdec_channel_bump_thread[348]: VDEC_MODULE module try again

[draw_rect]:[137]:========point is 0,return========
fps:55.555556,processing time:18
键盘按 CTRL+C 可以结束程序。
5.1.8. AI算法-目标检测(Yolov5)
本示例使用 Yolov5 算法模型实现视频图像中的目标检测。
环境准备:
1、 旭日X3派上电,LED指示绿灯熄灭,用户可以通过远程登录中介绍的其中一种方式连接上设备;
2、 通过HDMI线缆连接开发板和显示器
3、 连接好旭日X3派支持的mipi摄像头,MIPI摄像头的连接可以参考MIPI摄像头连接教程;
参数配置:
-f: 模型的路径
-h: 当模型类型为
fcos时,该项需要设置,为输入视频的高-w: 当模型类型为
fcos时,该项需要设置,为输入视频的宽-i: 当模型类型为
fcos时,该项需要设置,为输入视频的路径-m: 模型类型,目前支持:0:yolov5,1:fcos
sunrise@ubuntu:/app/bpu_cdev/src/bin$ sudo ./sample
Usage: sample [OPTION...]
bpu sample -- An C++ example of using bpu

  -f, --file=modle_file      path of model file
  -h, --video_height=height  height of video
  -i, --input_video=video path   path of video
  -m, --mode=type            0:yolov5;1:fcos
  -w, --video_width=width    width of video
  -?, --help                 Give this help list
      --usage                Give a short usage message

Mandatory or optional arguments to long options are also mandatory or optional
for any corresponding short options.
运行方式: 按照以下命令执行程序
sunrise@ubuntu:~$ cd /app/bpu_cdev/src
sunrise@ubuntu:/app/bpu_cdev/src$ sudo make
sunrise@ubuntu:/app/bpu_cdev/src$ cd bin
sunrise@ubuntu:/app/bpu_cdev/src/bin$ sudo ./sample -f /app/model/basic/yolov5_672x672_nv12.bin -m 0
预期效果:
make命令完成程序的编译,./sample -f /app/model/basic/yolov5_672x672_nv12.bin -m 0命令执行程序,程序正确运行后,会有如下打印,显示器上也会有相应的视频和算法检测框显示。
sunrise@ubuntu:/app/bpu_cdev/src/bin$ sudo ./sample -f /app/model/basic/yolov5_672x672_nv12.bin -m 0
[BPU_PLAT]BPU Platform Version(1.3.1)!
[HBRT] set log level as 0. version = 3.14.5
[DNN] Runtime version = 1.9.7_(3.14.5 HBRT)
Model info:
model_name: yolov5_672x672_nv12Input count: 1input[0]: tensorLayout: 2 tensorType: 1 validShape:(1, 3, 672, 672, ), alignedShape:(1, 3, 672, 672, )
Output count: 3Output[0]: tensorLayout: 0 tensorType: 13 validShape:(1, 84, 84, 255, ), alignedShape:(1, 84, 84, 255, )
Output[1]: tensorLayout: 0 tensorType: 13 validShape:(1, 42, 42, 255, ), alignedShape:(1, 42, 42, 255, )
Output[2]: tensorLayout: 0 tensorType: 13 validShape:(1, 21, 21, 255, ), alignedShape:(1, 21, 21, 255, )
Setting VPS channel-1: src_w:1920, src_h:1080; dst_w:672, dst_h:672;
Setting VPS channel-3: src_w:1920, src_h:1080; dst_w:1024, dst_h:600;
Setting VPS channel-2: src_w:1920, src_h:1080; dst_w:1920, dst_h:1080;
 start linear mode, sensor_name f37, setting_size = 3
libiar: hb_disp_set_timing done!
yolov5_do_post fps:11.627907,processing time :86
键盘按 CTRL+C 可以结束程序。