8. FAQ
8.1. 系统启动类
8.1.1. 旭日X3派上电后没有启动起来
【现象】 旭日X3派上电后, HDMI 无输出(完全黑屏),绿灯没有熄灭,连接串口后,发现停在uboot命令行下。
【排查】 出现此种情况的可能原因:
1)在开机过程中,串口有信号输入,导致系统停在了uboot阶段,重启设备即可恢复;
2)SD卡烧录不正确,无法正确读取到系统文件,导致启动失败;
3)太老旧的sd卡无法直接使用;
4)使用了不兼容的SD卡,建议使用大厂的SD卡,推荐使用至少8GB容量、速率C10以上的TF存储卡
8.1.2. 旭日X3派上电后反复重启无法进入系统
【现象】 旭日X3派上电后, HDMI 无输出(完全黑屏),绿灯没有熄灭,连接串口后,发现系统在反复重启,无法进入操作系统。
【排查】 此种情况一般为适配器供电不足,请检查电源适配器是否符合最低5V/2A的规格要求。此外请不要使用电脑的USB接口为开发板供电,因为USB3.0接口的驱动能力最大为5V/0.9A;平板电脑的充电器一般也有5V2A的,但是它们会有限流等情况,所以都不建议使用。
8.2. 系统配置类
8.2.1. 开发板默认支持的用户是什么?
【解答】 开发板默认支持两种账户,为免去sudo操作,可使用root用户登录:
1)用户名:sunrise 密码:sunrise
2)用户名:root 密码:root
8.2.2. NTFS文件系统挂载,不支持读写模式
【解答】 请安装ntfs-3g: sudo apt -y install ntfs-3g,然后进行正常挂载即可支持写模式。
8.2.3. 板端是否支持vscode?
【解答】 板端目前不支持vscode安装,建议使用开发机安装vscode进行远程开发
8.2.4. 如何启动adb?
【解答】 系统里面默认启动了adbd服务,可以参考 旭日X3派更新最小启动固件 文档中安装 adb 和 fastboot 命令部分,安装好驱动和adb程序,即可正常使用。
8.2.5. apt update无法执行问题
【现象】 在Desktop版本的系统上,设备刚完成网络配置,第一次可以访问到外网,如果立即运行 apt update,有可能会出现以下报错信息,提示有其他进程正在使用apt-get。
Reading package lists... Done
E: Could not get lock /var/lib/apt/lists/lock. It is held by process 4299 (apt-get)
N: Be aware that removing the lock file is not a solution and may break your system.
E: Unable to lock directory /var/lib/apt/lists/
【排查】 这个原因是 desktop版本里面的软件管理程序在自动运行软件版本检查程序,一般时间比较长。如果不想等待apt-get程序自动退出,可以执行 kill杀掉 apt-get。 如以上错误打印上提示 apt-get进程id为 4299,则执行 kill 4299 命令。
8.2.6. 系统更新失败
【现象】 使用了鱼香ros一键安装工具,导致系统更新失败
【排查】 鱼香ros一键安装工具会把apt源配置全部重置,包括地平线私有apt服务器的源也会删掉。可以安装如下方式重新添加源配置。
root@ubuntu:/etc/apt# cd sources.list.d/
root@ubuntu:/etc/apt/sources.list.d# ls
sunrise.list
root@ubuntu:/etc/apt/sources.list.d# cat sunrise.list
deb [signed-by=/usr/share/keyrings/sunrise.gpg] http://42.62.85.28/ubuntu-ports/ focal main
8.3. 常用工具类
8.3.1. 如何进行旭日X3派与电脑端文件传输?
【解答】 电脑与旭日X3派的文件相互拷贝有多种方式,如使用工具直接拖动,使用命令行直接拷贝等,scp命令行拷贝参考:
开发板通过有线以太网和电脑相连通。
拷贝单文件 local_file 到旭日X3派userdata目录下的命令:
scp local_file sunrise@192.168.1.10:/userdata/
拷贝整个文件夹 local_folder 的内容到旭日X3派userdata目录下的命令:
scp -r local_folder sunrise@192.168.1.10:/userdata/
8.4. 硬件类
8.4.1. 40Pin上的5V管脚可以用作旭日X3派的供电口吗?
【解答】 不可以。40Pin上的5V电和Type-C的5V电中间有一次隔离。
8.4.2. SDBX3开发板怎么使用Ubuntu系统?
【解答】 请参考地平线旭日3开发板Ubuntu20.04系统镜像安装。
8.5. 串口类
8.5.1. 电脑没有识别到串口设备
【现象】 电脑和开发板通过串口模块连接后,如果在串口软件的设备选择下拉框中没有找到设备,请右键在“我的电脑”中,打开“设备管理器”,
显示如下信息,USB转串口设备打感叹号,说明串口模块驱动未安装。
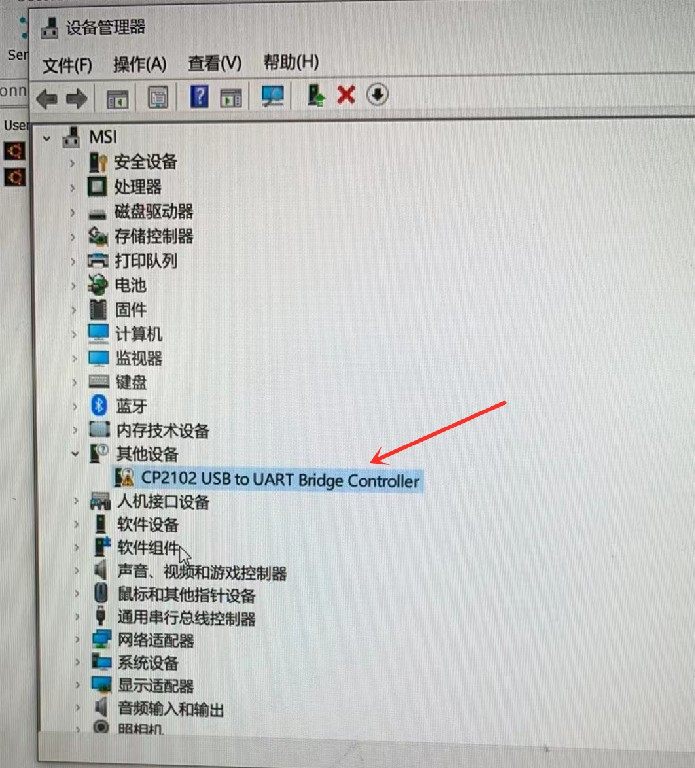
【排查】 确认系统是否已经安装串口模块的驱动。可以到 资源中心 工具部分下载串口驱动,解压后双击其中的dpinst64.exe进行安装,驱动安装完成后,再重新尝试通信。如下图所示是CP210X和CH340两种模块的正确设备信息:

8.5.2. 串口无法输入
【现象】 电脑和开发板通过串口模块连接后,终端软件通过串口登录设备后,可以看到日志信息和登录提示信息,但是无法输入任何数据,用户无法操作。
【排查】 可能的原因:
1) 确认使用的终端软件是否有远程交互功能,不能使用串口通信助手,而应该使用串口远程终端连接软件,如MobaXterm、TeraTerm等。
2)在终端软件的串口配置里面,需要取消流控功能,正确的配置如下图所示。
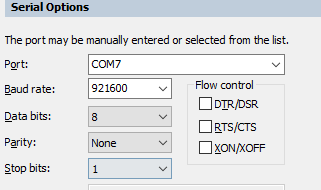
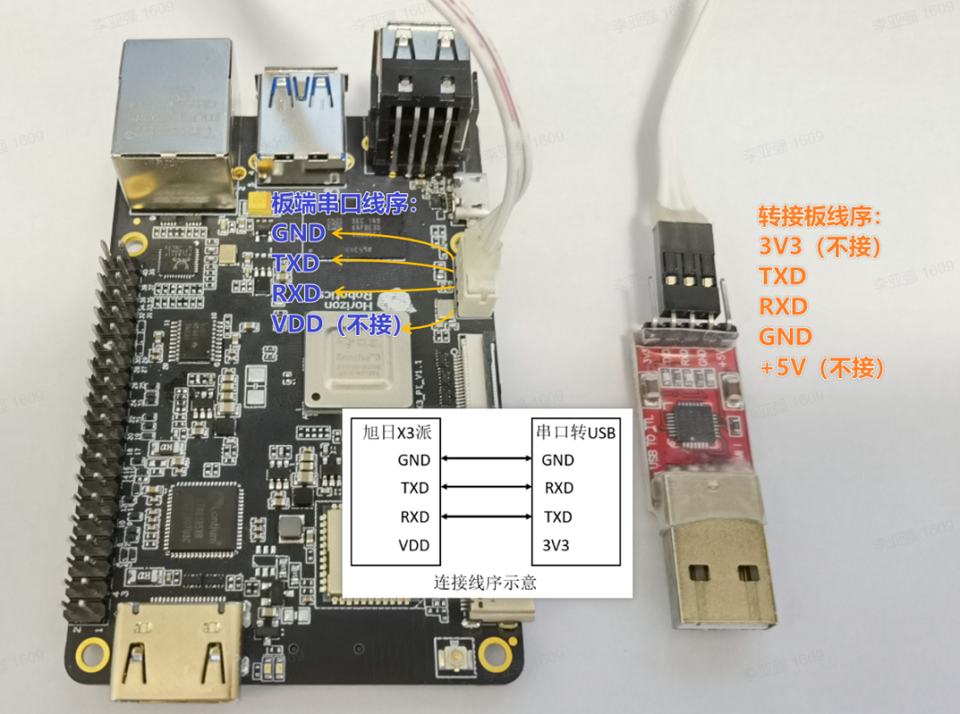
3)请检查串口线的连接,有输出信息说明串口的RX连接正确,有可能是TX没有接好,设备连接的线序如下所示。
8.6. 网络类
8.6.1. 旭日X3派无法连接外网
【解答】 请参考网络配置章节进行以太网或者WiFi网络配置。
8.6.2. PC无法通过网络连接旭日X3派
【解答】 请按照以下几个步骤排查:
1) 首先可以通过ping命令检查网络是否是连通的;
2)如果ping不通,请检查以太网连接是否牢靠,如果是WiFi,需要确认IP地址是否改变
3)通过串口登录设备,执行命令ifconfig查看网络配置信息,排除异常,比如ip地址配置不正确、网络节点没有link up等。
8.6.3. 无法通过SSH连接开发板
【现象1】 提示Connection timed out
【排查】 请参考SSH登录章节,确认IP地址输入是否正确。
【现象2】 提示 Authentication failed

【排查】 这个错误一般都是账户名和密码设置错误。
8.6.4. ssh断连,只有重启才行?
【解答】 首先验证是否有贴散热片,温度过高所致,另外请查看cpu和内存的占用率,是否硬件资源占用过多导致
8.6.5. WiFi信号比较弱
【解答】 板端wifi信号弱,请安装天线进行信号增强后进行调试。目前仅支持2.4G频段网络
8.6.6. Wifi无法使用,不能link up
【现象】 连接不上wifi, rescan热点时会报“Error: Scanning not allowed while unavailable or activating.” 。ifconfig 命令看不到wlan0节点,ifconfig -a时可以看到wlan0。
【排查】 执行 rfkill 命令查看一下wlan是否被 block ,如果是以下内容:

请执行 rfkill unblock wlan 命令使能wlan的RF。
8.7. USB类
8.7.1. USB摄像头识别问题
【问题1】 插入usb摄像头后生成的设备节点默认是什么?
【解答】 /dev/video8
【问题2】 插入usb摄像头后,没有生成/dev/video8节点
【排查】 以下几个点需要检查:
1)旭日X3派上的Micro USB口不可以连接数据线
2)请验证usb摄像头是否为标准usb设备,可以接入到电脑上查看是否正常
3)登录设备执行 lsusb命令查看是否有识别到usb设备的插入
4)执行lsmod命令查看 uvcvideo 驱动是否已经加载
8.7.2. 遥控手柄无法使用
【现象】 USB接口的手柄接入设备后,无法使用,没有产生/dev/input/js0设备节点
【解答】 请把旭日X3派系统更新到最新版本,按照以下步骤说明安装驱动和工具即可正常使用
加载驱动: sudo modprobe -a joydev
安装测试工具: sudo apt install joystick
测试命令:jstest /dev/input/js0
8.8. 40Pin类
8.8.1. 怎么用C/C++语言操作40Pin?
【解答】 请访问 旭日X3派WiringPi了解详情。
8.9. 摄像头类
8.9.1. Mipi 摄像头无法使用问题
【现象】 Mipi摄像头连接到旭日X3派上后无法使用。
【排查】 请按照如下思路排查:
1) 重新插拔camera,排查连接不稳定的原因,确认连接线没有接反(需要使用异面的连接排线)
2) 确认是按照 MIPI摄像头 中的命令进行的检查
3) 如果有额外的camera,可以交叉验证,确认是camera故障还是旭日X3派故障
4) 通过以上排查,基本可以确定问题原因:链接异常、命令使用不正确、camera损坏、旭日X3派损坏。
8.10. 视频输入类
8.10.1. 运行MIPI摄像头示例时失败
【现象】 在运行MIPI摄像头示例时失败,报如下错误。
sunrise@ubuntu:/app/ai_inference/03_mipi_camera_sample$ python3 mipi_camera.py
Traceback (most recent call last):
  File "mipi_camera.py", line 29, in <module>
    disp_w, disp_h = get_display_res()
  File "mipi_camera.py", line 27, in get_display_res
    return int(res[1]), int(res[0])
ValueError: invalid literal for int() with base 10: b'open device /dev/lt8618_ioctl failed\ndevice not open\n1080'
【排查】 使用sunrise用户登录时,运行示例代码需要加上 sudo,正确命令应是sudo python3 mipi_camera.py 。 如果不想每次都添加sudo执行命令,可以切换到root用户下运行。
8.11. 视频输出类
8.11.1. HDMI可以输出的分辨率?
**【解答】**最大只支持1080P的输出分辨率。
8.12. 视频编解码类
8.12.1. 解码失败
推流服务器推送的rtsp码流里面需要包含PPS和SPS参数信息,否则会导致旭日X3派解码异常,错误信息如下:

使用ffmpeg打开.mp4 .avi等格式的视频文件推流时,需要添加-vbsf h264_mp4toannexb选项,以添加码流的PPS 和SPS信息,例如:
ffmpeg -re -stream_loop -1 -i xxx.mp4 -vcodec copy -vbsf h264_mp4toannexb -f rtsp rtsp://192.168.1.195:8554/h264_stream
rtsp
视频流目前仅支持1080p分辨率
不建议使用vlc软件进行rtsp推流,因为vlc软件不支持添加PPS和SPS信息。
8.13. 音频类
8.14. 机器人开发平台类
8.14.1. TROS安装后找不到
# 配置TogetherROS环境
root@ubuntu:~# source /opt/tros/setup.bash

# 查询TogetherROS版本号
root@ubuntu:~# apt show tros
查询输出如下:
Package: tros
Version: 1.1.2
Status: install ok installed
Section: utils
Maintainer: kairui.wang <kairui.wang@horizon.ai style="word-wrap: break-word;">
Installed-Size: 1,536 MB
Pre-Depends: hhp-verify
Depends: symlinks, locales
Download-Size: unknown
APT-Manual-Installed: yes
APT-Sources: /var/lib/dpkg/status
Description: TogetherROS

N: There are 3 additional records. Please use the '-a' switch to see them.
其中Version: 1.1.2表示安装的TROS版本号为1.1.2。
8.14.2. sunrise账号运行报无权限错误
X3派上使用硬件需要root权限,请使用root账号(密码root)登录X3派。
8.14.3. root和sunrise账号不能通信
ROS2在不同账号之间无法通信,考虑到X3派上使用硬件需要root权限,请使用root账号(密码root)登录X3派。
8.14.4. 跨设备通信问题
ROS2跨设备通信要求通信方的IP地址属于同一网段,并且配置了ROS2/TogetherROS环境。
8.14.5. PC端ROS2安装源问题
参考配置https://www.originbot.org/guide/pc_config/#2-ros2
8.14.6. X3派桌面版本安装rviz、gazebo等可视化程序?
板端目前不支持OpenGL加速的可视化程序,请在PC端安装使用。
8.14.7. 4663 camera无法识别
输入命令i2cdetect -y -r 1查询摄像头是否连接好。
F37和GC4663摄像头输出分别如下:
F37:
     0  1  2  3  4  5  6  7  8  9  a  b  c  d  e  f
00:          -- -- -- -- -- -- -- -- -- -- -- -- --
10: -- -- -- -- -- -- -- -- -- -- -- -- -- -- -- --
20: -- -- -- -- -- -- -- -- -- -- -- -- -- -- -- --
30: -- -- -- -- -- -- -- -- -- -- -- UU -- -- -- --
40: 40 -- -- -- -- -- -- -- -- -- -- -- -- -- -- --
50: -- -- -- -- -- -- -- -- -- -- -- -- -- -- -- --
60: -- -- -- -- -- -- -- -- -- -- -- -- -- -- -- --
70: -- -- -- -- -- -- -- --

GC4663:
     0  1  2  3  4  5  6  7  8  9  a  b  c  d  e  f
00:          -- -- -- -- -- -- -- -- -- -- -- -- --
10: -- -- -- -- -- -- -- -- -- -- -- -- -- -- -- --
20: -- -- -- -- -- -- -- -- -- 29 -- -- -- -- -- --
30: -- -- -- -- -- -- -- -- -- -- -- UU -- -- -- --
40: -- -- -- -- -- -- -- -- -- -- -- -- -- -- -- --
50: -- -- -- -- -- -- -- -- -- -- -- -- -- -- -- --
60: -- -- -- -- -- -- -- -- -- -- -- -- -- -- -- --
70: -- -- -- -- -- -- -- --
8.14.8. 跑某个camera应用无法正常运行
(1)排查是否连接好摄像头。
(2)确实配置参数和实际摄像头是否匹配。
参考问题7,输入命令i2cdetect -y -r 1查询连接的摄像头类型。
检查启动脚本中video_device配置项和实际连接的摄像头是否匹配。
(3)是否重复启动。
X3派上使用ps -aux或者top命令查看是否有mipi_cam进程在运行,有的话kill掉。
硬件设备只能被一个进程占用,因此程序启动后,如果不再使用请停止程序。
8.14.9. 如何修改launch启动脚本
例如需要修改mipi_cam.launch.py脚本中的参数,使用find命令查询其在TogetherROS安装路径下的位置:
root@ubuntu:~# find /opt/tros -name mipi_cam.launch.py
/opt/tros/share/mipi_cam/launch/mipi_cam.launch.py
8.15. AI工具链类
8.15.1. 模型量化错误及解决方法
8.15.1.1. hb_mapper checker (01_check.sh) 错误
报错信息:
ERROR The shape of model input:input is [xxx] which has dimensions of 0. Please specify input-shape parameter.解决方法: 发生此错误的原因可能是模型输入为动态shape。针对此错误,您可使用参数
--input-shape“input_name input_shape”来指定输入节点的shape信息。报错信息:
ERROR HorizonRT not support these cpu operators: {op_type}解决方法: 发生此错误的原因可能是使用的CPU算子为地平线不支持的CPU算子。 针对此错误,您可以根据我们提供的算子支持列表中的内容对算子进行替换;若不被支持的CPU算子为模型核心算子,请您联系地平线对此进行开发评估。
报错信息:
Unsupported op {op_type}解决方法: 发生此错误的原因可能是使用的BPU算子为地平线不支持的BPU算子。针对此错误,若模型整体性能可满足需要,您可以忽略该日志;若模型整体性能不能达到您的预期,您可以根据我们提供的算子支持列表中的内容对算子进行替换。
报错信息:
ERROR nodes:['{op_type}'] are specified as domain:xxx, which are not supported by official onnx. Please check whether these ops are official onnx ops or defined by yourself解决方法: 发生此错误的原因可能是使用的自定义算子为地平线不支持的自定义算子。针对此错误,您可以根据我们提供的算子支持列表中的内容对算子进行替换或参考自定义算子开发完成自定义CPU算子注册。
8.15.1.2. hb_mapper makertbin (03_build.sh) 错误
报错信息:
Layer {op_name}
    xxx expect data shape range:[[xxx][xxx]], but the data shape is [xxx]
Layer {op_name}
    Tensor xxx expects be n dimensions, but m provided
解决方法: 发生此错误的原因可能是,{op_name}算子超过支持限制被回退到CPU计算。针对此错误,若CPU算子带来的性能损耗您可接受,则无需关注该信息;若性能不能达到您的要求,您可以根据我们提供的算子支持列表中的内容将该op修改至BPU可支持的范围。
报错信息:
INFO: Layer {op_name} will be executed on CPU解决方法: 发生此错误的原因可能是,{op_name}算子由于shape(CxHxW)超过8192被回退到CPU计算。针对此错误,若仅少数算子被回退CPU计算且模型整体性能满足要求,则无需关注该信息;若性能不满足要求,建议查看算子支持列表,替换为其他无shape限制的BPU算子。
报错信息:
ERROR There is an error in pass: {op_name}. Error message:xxx
解决方法: 发生此错误的原因可能是,{op_name}算子优化失败。针对此错误,请您将模型以及.log文件收集好后提供给地平线技术人员进行分析处理。
报错信息:
Error There is an error in pass:constant_folding. Error message: Could not find an implementation for the node {op_name}
解决方法: 发生此错误的原因可能是该算子onnxruntime暂未支持。针对此错误,您可以根据我们提供的算子支持列表中的内容对算子进行替换,如不被支持的算子为核心算子,请您联系地平线对此进行开发评估。
报错信息:
WARNING input shape [xxx] has length: n ERROR list index out of range
解决方法: 发生此错误的原因可能是目前模型输入暂不支持非四维输入。针对此错误,建议您将模型输入修改至四维(例如HxW -> 1x1xHxW)。
报错信息:
Start to parse the onnx model
core dump
解决方法: 发生此错误的原因可能是模型解析失败(可能是导出模型时只为一个output/input节点指定了name)。针对此错误,建议您重新导出onnx并确认其有效性(导出onnx模型时不指定output/input name,或者依次为每个output/input节点指定名称)。
报错信息:
Start to calibrate/quantize the model
core dump

Start to compile the model
core dump
解决方法: 发生此错误的原因可能是模型量化/编译失败。针对此错误,请您将模型以及.log文件收集好后提供给地平线技术人员进行分析处理。
报错信息:
ERROR model conversion faild: Inferred shape and existing shape differ in dimension x: (n) vs (m)
解决方法: 发生此错误的原因可能是onnx模型的输入shape非法,或者是工具优化pass有误。针对此错误,请您确保onnx模型的有效性,若onnx模型可正常推理,请将模型提供给地平线技术人员进行分析处理。
报错信息:
WARNING got unexpected input/output/sumin threshold on conv {op_name}! value: xxx解决方法: 发生此错误的原因可能是数据预处理有误,或该节点weight值太小/太大。针对此错误,1.请您检查数据预处理是否有误;2.我们建议您使用BN算子优化数据分布。
报错信息:
ERROR hbdk-cc compile hbir model failed with returncode -n
解决方法: 发生此错误的原因可能是模型编译失败。针对此错误,请您将模型以及.log文件收集好后提供给地平线技术人员进行分析处理。
报错信息:
ERROR {op_type} only support 4 dim input
解决方法: 发生此错误的原因可能是工具链暂不支持该op输入维度为非四维。针对此错误,我们建议您将该op输入维度调整为四维输入。
报错信息:
ERROR {op_type} Not support this attribute/mode=xxx
解决方法: 发生此错误的原因可能是工具链暂不支持op的该属性。针对此错误,您可以根据我们提供的算子支持列表中的内容进行替换或联系地平线对此进行开发评估。
报错信息:
ERROR There is no node can execute on BPU in this model, please make sure the model has at least one conv node which is supported by BPU.
解决方法: 发生此错误的原因可能是模型中没有可量化的BPU节点。针对此错误,请您确保onnx模型的有效性,且模型中至少使用了一个conv;若前述条件均已满足,请您将模型以及.log文件收集好后提供给地平线技术人员进行分析处理。
报错信息:
ERROR [ONNXRuntimeError] : 9 : NOT_IMPLEMENTED : could not find a implementation for the node of {op_name}:{op_type}(opset)
解决方法: 发生此错误的原因可能是模型opset版本超出工具链支持限制。 针对此错误,请您重新导出模型,确保
opset_version=10或者11。报错信息:
ERROR The opset version of the onnx model is n, only model with opset_version 10/11 is supported
解决方法: 发生此错误的原因可能是模型opset版本超出工具链支持限制。针对此错误,请您重新导出模型,确保
opset_version=10 或者 11。报错信息:
使用run_on_bpu后转换报错。
解决方法: 发生此错误的原因可能是目前暂不支持将该算子run_on_bpu。
run_on_bpu暂仅支持指定模型尾部的Relu/Softmax/pooling(maxpool、avgpool等)算子以及CPU*+Transpose组合(可通过声明Transpose节点名称,将CPU*+Transpose都运行在BPU上,CPU*特指BPU支持的op),若满足前述条件但仍run_on_bpu失败,请您联系地平线技术人员对此进行分析处理;若不满足前述条件,可联系地平线技术人员对此进行开发评估。报错信息:
ERROR tool limits for max output num is 32
解决方法: 发生此错误的原因可能是工具链仅支持模型输出节点数量不超过32。针对此错误,建议您将模型输出节点数量控制在32个以内。
8.15.2. 算法模型上板错误及解决方法
报错信息:
(common.h:79): HR:ERROR: op_name:xxx invalid attr key xxx
解决方法: 发生此错误的原因可能是libDNN暂不支持该op的某个属性。针对此错误,您可以根据我们提供的算子支持列表中的内容进行替换或联系地平线对此进行开发评估。
报错信息:
(hb_dnn_ndarray.cpp:xxx): data type of ndarray do not match specified type. NDArray dtype_: n, given:m
解决方法: 发生此错误的原因可能是libDNN暂不支持该输入类型(后续我们将逐步把算子约束前移至模型转换阶段提醒)。针对此错误,您可以根据我们提供的算子支持列表中的内容进行替换或联系地平线对此进行开发评估。
报错信息:
(validate_util.cpp:xxx):tensor aligned shape size is xxx , but tensor hbSysMem memSize is xxx, tensor hbSysMem memSize should >= tensor aligned shape size!
解决方法: 发生此错误的原因可能是输入数据申请内存不足。针对此错误,请使用hbDNNTensorProperties.alignedByteSize来申请内存空间。
报错信息:
(bpu_model_info.cpp:xxx): HR:ERROR: hbm model input feature names must be equal to graph node input names
解决方法: 针对此错误,请您完整更新最新版本的工具链SDK开发包。
8.15.3. 模型量化及上板使用技巧
8.15.3.1. 示例YOLOv5x模型使用说明
YOLOv5x模型:
可以从URL:yolov5-2.0 中下载相应的pt文件。
在clone代码时,请确认您使用的Tags是
v2.0,否则将导致转换失败。md5sum码:
| md5sum | File |
|---|---|
| 2e296b5e31bf1e1b6b8ea4bf36153ea5 | yolov5l.pt |
| 16150e35f707a2f07e7528b89c032308 | yolov5m.pt |
| 42c681cf466c549ff5ecfe86bcc491a0 | yolov5s.pt |
| 069a6baa2a741dec8a2d44a9083b6d6e | yolov5x.pt |
为了更好地适配后处理代码,我们在ONNX模型导出前对Github代码做了如下修改 (代码参见:https://github.com/ultralytics/yolov5/blob/v2.0/models/yolo.py):
    def forward(self, x):
        # x = x.copy()  # for profiling
        z = []  # inference output
        self.training |= self.export
        for i in range(self.nl):
            x[i] = self.m[i](x[i])  # conv
            bs, _, ny, nx = x[i].shape  # x(bs,255,20,20) to x(bs,3,20,20,85)
            #  x[i] = x[i].view(bs, self.na, self.no, ny, nx).permute(0, 1, 3, 4, 2).contiguous()
            x[i] = x[i].permute(0, 2, 3, 1).contiguous()
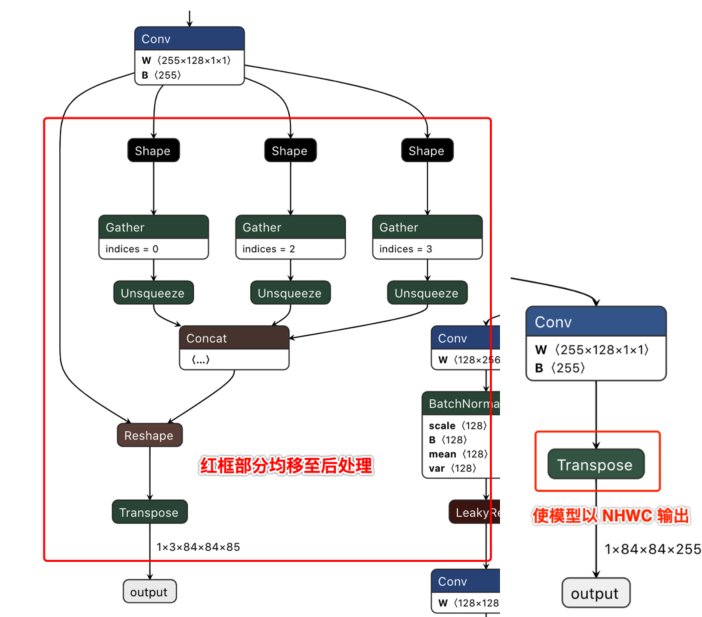
说明: 去除了每个输出分支尾部从4维到5维的reshape(即不将channel从255拆分成3x85),然后将layout从NHWC转换成NCHW再输出。
以下左图为修改前的模型某一输出节点的可视化图,右图则为修改后的对应输出节点可视化图。
下载完成后通过脚本 https://github.com/ultralytics/yolov5/blob/v2.0/models/export.py 进行pt文件到ONNX文件的转换。
注意事项
在使用export.py脚本时,请注意:
由于地平线AI工具链支持的ONNX opset版本为
10和11,请将torch.onnx.export的opset_version参数根据您要使用的版本进行修改。将
torch.onnx.export部分的默认输入名称参数由'images'改为'data',与模型转换示例包的YOLOv5x示例脚本保持一致。将
parser.add_argument部分中默认的数据输入尺寸640x640改为模型转换示例包YOLOv5x示例中的672x672。
8.15.3.2. 模型精度调优checklist
请严格按照下图中步骤1-5来进行模型精度验证并保留每个步骤的代码和结果:
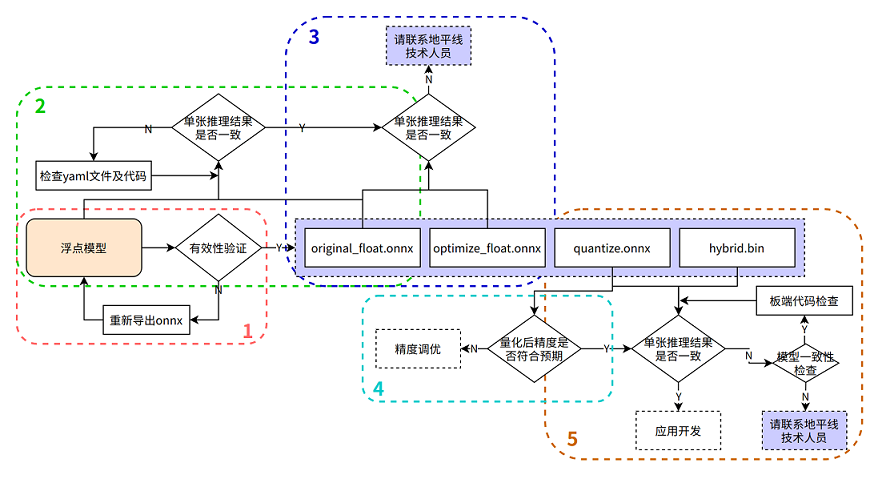
在进行排查前,请确认当前模型转换所用的Docker镜像或转换环境版本,并保留版本信息
1. 验证浮点onnx模型的推理结果
进入模型转换环境,来测试浮点onnx模型(特指从DL框架导出的onnx模型)的单张结果,此步骤结果应与训练后的模型推理结果完全一致(nv12格式除外,可能会引入少许差异)
可参考如下示例代码步骤,来确认浮点onnx模型的推理的步骤、数据预处理、后处理代码是否正确!
  from horizon_tc_ui import HB_ONNXRuntime
  import numpy as np
  import cv2

  def preprocess(input_name):
      # BGR->RGB、Resize、CenterCrop···
      # HWC->CHW
      # normalization
      return data

  def main():
      # 加载模型文件
      sess = HB_ONNXRuntime(model_file=MODEL_PATH)
      # 获取输入&输出节点名称
      input_names = [input.name for input in sess.get_inputs()]
      output_names = [output.name for output in sess.get_outputs()]
      # 准备模型输入数据
      feed_dict = dict()
      for input_name in input_names:
          feed_dict[input_name] = preprocess(input_name)

      # 原始浮点onnx,数据dtype=float32
      outputs = sess.run_feature(output_names, feed_dict, input_offset=0)

      # 后处理
      postprocess(outputs)

  if __name__ == '__main__':
      main()
2. 验证yaml配置文件以及前、后处理代码的正确性
测试 original_float.onnx 模型的单张结果,应与浮点onnx模型推理结果完全一致(nv12格式除外,由于nv12数据本身有损,可能会引入少许差异)
使用开源工具 Netron 打开 original_float.onnx 模型,并查看预处理节点 HzPreprocess 算子的详细属性,获取我们 数据预处理 需要的参数:data_format 和 input_type。
由于HzPreprocess节点的存在,会使得转换后的模型其预处理操作可能会和原始模型有所不同,该算子是在进行模型转换时,根据yaml配置文件中的配置参数(input_type_rt、input_type_train以及norm_type、mean_value、scale_value)来决定是否为模型加入HzPreprocess节点,预处理节点的生成细节,请参考PTQ原理及步骤详解章节的 norm_type 配置参数说明 内容,另外预处理节点会出现在转换过程产生的所有产物中。
理想状态下,这个HzPreprocess节点应该完成 input_type_rt 到 input_type_train 的完整转换, 但实际情况是整个type转换过程需要使用地平线AI芯片硬件完成,但ONNX模型里面并没有包含硬件转换的部分,因此ONNX的真实输入类型会使用一种中间类型,这种中间类型就是硬件对 input_type_rt 的处理结果类型, 故针对图像输入数据类型为:RGB/BGR/NV12/YUV444/GRAY,并且数据dtype= uint8的模型时,在预处理代码中需要做 -128 的操作,featuremap 数据类型因为使用的是float32,因此预处理代码中 不需要-128 的操作; original_float.onnx的数据layout(NCHW/NHWC)会保持和原始浮点模型的输入layout一致。
可参考如下示例代码步骤,来确认 original_float.onnx 模型的推理的步骤、数据预处理、后处理代码是否正确!
数据预处理部分建议参考使用地平线模型转换 horizon_model_convert_sample 示例包中的caffe、onnx等示例模型的预处理步骤方法
  from horizon_tc_ui import HB_ONNXRuntime
  import numpy as np
  import cv2

  def preprocess(input_name):
      # BGR->RGB、Resize、CenterCrop···
      # HWC->CHW(通过onnx模型输入节点的具体shape来判断是否需要做layout转换)
      # normalization(若已通过yaml文件将norm操作放入了模型中,则不要在预处理中做重复操作)
      #-128(图像输入模型,仅在使用hb_session.run接口时需要自行在预处理完成-128,其他接口通过input_offset控制即可)
      return data

  def main():
      # 加载模型文件
      sess = HB_ONNXRuntime(model_file=MODEL_PATH)
      # 获取输入&输出节点名称
      input_names = [input.name for input in sess.get_inputs()]
      output_names = [output.name for output in sess.get_outputs()]
      # 准备模型输入数据
      feed_dict = dict()
      for input_name in input_names:
          feed_dict[input_name] = preprocess(input_name)
      #图像输入的模型(RGB/BGR/NV12/YUV444/GRAY),数据dtype= uint8
      outputs = sess.run(output_names, feed_dict, input_offset=128)
      # featuremap模型,数据dtype=float32, 若模型输入非featuremap,请注释掉下行代码!
      outputs = sess.run_feature(output_names, feed_dict, input_offset=0)
      # 混合多输入(即同时包含featuremap和图像输入)模型,若模型输入非多输入,请注释掉下行代码!
      outputs = sess.hb_session.run(output_names, feed_dict)  #-128的操作需要在预处理时完成
      # 后处理
      postprocess(outputs)

  if __name__ == '__main__':
      main()
3. 验证模型的图优化阶段未引入精度误差
测试 optimize_float.onnx 模型的单张结果,应与original_float.onnx推理结果完全一致
使用开源工具 Netron 打开 optimize_float.onnx 模型,并查看预处理节点 HzPreprocess 算子的详细属性,获取我们数据预处理需要的参数:data_format和 input_type;
optimize_float.onnx模型的推理可参考如下示例代码步骤,来确认 optimize_float.onnx 模型的推理的步骤、数据预处理、后处理代码是否正确!
数据预处理部分建议参考使用地平线模型转换 horizon_model_convert_sample 示例包中的caffe、onnx等示例模型的预处理步骤方法
  from horizon_tc_ui import HB_ONNXRuntime
  import numpy as np
  import cv2

  def preprocess(input_name):
      # BGR->RGB、Resize、CenterCrop···
      # HWC->CHW(通过onnx模型输入节点的具体shape来判断是否需要做layout转换)
      # normalization(若已通过yaml文件将norm操作放入了模型中,则不要在预处理中做重复操作)
      #-128(图像输入模型,仅在使用hb_session.run接口时需要自行在预处理完成-128,其他接口通过input_offset控制即可)
      return data

  def main():
      # 加载模型文件
      sess = HB_ONNXRuntime(model_file=MODEL_PATH)
      # 获取输入&输出节点名称
      input_names = [input.name for input in sess.get_inputs()]
      output_names = [output.name for output in sess.get_outputs()]
      # 准备模型输入数据
      feed_dict = dict()
      for input_name in input_names:
          feed_dict[input_name] = preprocess(input_name)
      #图像输入的模型(RGB/BGR/NV12/YUV444/GRAY),数据dtype= uint8
      outputs = sess.run(output_names, feed_dict, input_offset=128)
      # featuremap模型,数据dtype=float32, 若模型输入非featuremap,请注释掉下行代码!
      outputs = sess.run_feature(output_names, feed_dict, input_offset=0)
      # 混合多输入(即同时包含featuremap和图像输入)模型,若模型输入非多输入,请注释掉下行代码!
      outputs = sess.hb_session.run(output_names, feed_dict)  #-128的操作需要在预处理时完成
      # 后处理
      postprocess(outputs)

  if __name__ == '__main__':
      main()
4. 验证量化精度是否满足预期
测试quantized.onnx的精度指标。
使用开源工具 Netron 打开 quantized.onnx 模型,并查看预处理节点 HzPreprocess 算子的详细属性,获取我们数据预处理需要的参数:data_format和 input_type;
quantized.onnx模型的推理可参考如下示例代码步骤,来确认 quantized.onnx 模型的推理的步骤、数据预处理、后处理代码是否正确!
数据预处理部分建议参考使用地平线模型转换 horizon_model_convert_sample 示例包中的caffe、onnx等示例模型的预处理步骤方法
  from horizon_tc_ui import HB_ONNXRuntime
  import numpy as np
  import cv2

  def preprocess(input_name):
      # BGR->RGB、Resize、CenterCrop···
      # HWC->CHW(通过onnx模型输入节点的具体shape来判断是否需要做layout转换)
      # normalization(若已通过yaml文件将norm操作放入了模型中,则不要在预处理中做重复操作)
      #-128(图像输入模型,仅在使用hb_session.run接口时需要自行在预处理完成-128,其他接口通过input_offset控制即可)
      return data

  def main():
      # 加载模型文件
      sess = HB_ONNXRuntime(model_file=MODEL_PATH)
      # 获取输入&输出节点名称
      input_names = [input.name for input in sess.get_inputs()]
      output_names = [output.name for output in sess.get_outputs()]
      # 准备模型输入数据
      feed_dict = dict()
      for input_name in input_names:
          feed_dict[input_name] = preprocess(input_name)
      #图像输入的模型(RGB/BGR/NV12/YUV444/GRAY),数据dtype= uint8
      outputs = sess.run(output_names, feed_dict, input_offset=128)
      # featuremap模型,数据dtype=float32, 若模型输入非featuremap,请注释掉下行代码!
      outputs = sess.run_feature(output_names, feed_dict, input_offset=0)
      # 混合多输入(即同时包含featuremap和图像输入)模型,若模型输入非多输入,请注释掉下行代码!
      outputs = sess.hb_session.run(output_names, feed_dict)  #-128的操作需要在预处理时完成
      # 后处理
      postprocess(outputs)

  if __name__ == '__main__':
      main()
5. 确保模型编译过程无误且板端推理代码正确
使用 hb_model_verifier 工具验证quantized.onnx和.bin的一致性,模型输出应至少满足小数点后2-3位对齐
hb_model_verifier工具(详细介绍可参考)的使用方法,请参考PTQ原理及步骤详解章节的 hb_model_verifier 工具 内容。
若模型一致性校验通过,则请仔细检查开发板端的前、后处理代码!
若quantized.onnx与.bin模型一致性校验失败,请联系地平线技术人员
8.15.3.3. 模型量化yaml配置文件模板
caffe模型量化yaml文件模板
请新建 caffe_config.yaml 文件,并直接拷贝以下内容,填写空白参数位置即可,参数的具体说明请参考PTQ原理及步骤详解章节内容
# Copyright (c) 2020 Horizon Robotics.All Rights Reserved.
#
# The material in this file is confidential and contains trade secrets
# of Horizon Robotics Inc. This is proprietary information owned by
# Horizon Robotics Inc. No part of this work may be disclosed,
# reproduced, copied, transmitted, or used in any way for any purpose,
# without the express written permission of Horizon Robotics Inc.

# 模型转化相关的参数
# ------------------------------------
# model conversion related parameters
model_parameters:

  # Caffe浮点网络数据模型文件
  # -----------------------------------------------------------
  # the model file of floating-point Caffe neural network data
  # 请配置需要转换的模型文件相对路径或绝对路径
  caffe_model: ''
  # caffe_model: './horizon_x3_caffe.caffemodel'

  # Caffe网络描述文件
  # ---------------------------------------------------------
  # the file describes the structure of Caffe neural network
  # 请配置需要转换的模型文件相对路径或绝对路径
  prototxt: ''
  # prototxt: './horizon_x3_caffe.prototxt'

  # 适用BPU架构
  # --------------------------------
  # the applicable BPU architecture
  # 保持默认,不要修改!
  march: "bernoulli2"

  # 指定模型转换过程中是否输出各层的中间结果,如果为True,则输出所有层的中间输出结果,
  # --------------------------------------------------------------------------------------
  # specifies whether or not to dump the intermediate results of all layers in conversion
  # if set to True, then the intermediate results of all layers shall be dumped
  # 保持默认,不要修改!
  layer_out_dump: False

  # 模型转换输出的结果的存放目录
  # -----------------------------------------------------------
  # the directory in which model conversion results are stored
  # 保持默认,可不配置
  working_dir: 'model_output'

  # 模型转换输出的用于上板执行的模型文件的名称前缀
  # -----------------------------------------------------------------------------------------
  # model conversion generated name prefix of those model files used for dev board execution
  # 模型转换后 输出的成果物 名字前缀, 可以根据自身需要配置
  output_model_file_prefix: 'horizon_x3'

# 模型输入相关参数, 若输入多个节点, 则应使用';'进行分隔, 使用默认缺省设置则写None
# ---------------------------------------------------------------------------------
# model input related parameters,
# please use ";" to seperate when inputting multiple nodes,
# please use None for default setting
input_parameters:

  # (选填) 模型输入的节点名称, 此名称应与模型文件中的名称一致, 否则会报错, 不填则会使用模型文件中的节点名称
  # --------------------------------------------------------------------------------------------------------
  # (Optional) node name of model input,
  # it shall be the same as the name of model file, otherwise an error will be reported,
  # the node name of model file will be used when left blank
  # 保持默认,可不配置
  input_name: ""

  # 网络实际执行时,输入给网络的数据格式,包括 nv12/rgb/bgr/yuv444/gray/featuremap,
  # ------------------------------------------------------------------------------------------
  # the data formats to be passed into neural network when actually performing neural network
  # available options: nv12/rgb/bgr/yuv444/gray/featuremap,
  # 此选项为 模型转换后在X3芯片上运行的数据类型,一般建议配置为nv12, 若想使用其他数据类型,请根据自身需要配置
  input_type_rt: ''
  # input_type_rt: 'nv12'

  # 网络实际执行时输入的数据排布, 可选值为 NHWC/NCHW
  # 若input_type_rt配置为nv12,则此处参数不需要配置
  # ------------------------------------------------------------------
  # the data layout formats to be passed into neural network when actually performing neural network, available options: NHWC/NCHW
  # If input_type_rt is configured as nv12, then this parameter does not need to be configured
  input_layout_rt: ''
  #input_layout_rt: '' 若input_type_rt配置为nv12,则此处参数不需要配置
  #input_layout_rt: 'NHWC'

  # 网络训练时输入的数据格式,可选的值为rgb/bgr/gray/featuremap/yuv444
  # --------------------------------------------------------------------
  # the data formats in network training
  # available options: rgb/bgr/gray/featuremap/yuv444
  # 此选项配置来源:原始浮点模型训练框架中所使用训练的数据类型
  input_type_train: ''
  # input_type_train: 'bgr'

  # 网络训练时输入的数据排布, 可选值为 NHWC/NCHW
  # ------------------------------------------------------------------
  # the data layout in network training, available options: NHWC/NCHW
  # 此选项配置来源:原始浮点模型训练框架中所使用训练的数据排布
  input_layout_train: ''
  # input_layout_train: 'NCHW'
  # input_layout_train: 'NHWC'

  # (选填) 模型网络的输入大小, 以'x'分隔, 不填则会使用模型文件中的网络输入大小,否则会覆盖模型文件中输入大小
  # -------------------------------------------------------------------------------------------
  # (Optional)the input size of model network, seperated by 'x'
  # note that the network input size of model file will be used if left blank
  # otherwise it will overwrite the input size of model file
  # 保持默认,可不配置
  input_shape: ''

  # 网络实际执行时,输入给网络的batch_size, 默认值为1
  # ---------------------------------------------------------------------
  # the data batch_size to be passed into neural network when actually performing neural network, default value: 1
  #input_batch: 1

  # 网络输入的预处理方法,主要有以下几种:
  # no_preprocess 不做任何操作,对应的 mean_value  或者 scale_value 都不需要配置!
  # data_mean 减去通道均值mean_value
  # data_scale 对图像像素乘以data_scale系数
  # data_mean_and_scale 减去通道均值后再乘以scale系数,标识下方对应的 mean_value  和 scale_value 都需要配置!
  # -------------------------------------------------------------------------------------------
  # preprocessing methods of network input, available options:
  # 'no_preprocess' indicates that no preprocess will be made
  # 'data_mean' indicates that to minus the channel mean, i.e. mean_value
  # 'data_scale' indicates that image pixels to multiply data_scale ratio
  # 'data_mean_and_scale' indicates that to multiply scale ratio after channel mean is minused
  # 若配置的是data_mean_and_scale,则下面的 mean_value 和 scale_value都必须配置,若norm_type 选择只有data_mean 或者 data_scale,那只用单独配置对应的 mean_value  或者 scale_value即可,并将没有使能的选项注释掉!
  norm_type: ''
  # norm_type: 'data_mean_and_scale'

  # 图像减去的均值, 如果是通道均值,value之间必须用空格分隔
  # --------------------------------------------------------------------------
  # the mean value minused by image
  # note that values must be seperated by space if channel mean value is used
  # 根据norm_type来决定是否需要配置此选项,若norm_type 选择只有data_mean,则只需单独配置此选项并将data_scale注释掉; 反之注释掉此选项!
  mean_value:
  # mean_value: 128.0
  # mean_value: 111.0 109.0 118.0

  # 图像预处理缩放比例,如果是通道缩放比例,value之间必须用空格分隔
  # ---------------------------------------------------------------------------
  # scale value of image preprocess
  # note that values must be seperated by space if channel scale value is used
  # 根据norm_type来决定是否需要配置此选项,若norm_type 选择只有data_scale,则只需单独配置此选项并将data_mean注释掉; 反之注释掉此选项!
  scale_value:
  # scale_value: 0.0078125
  # scale_value: 0.0078125 0.001215 0.003680

# 模型量化相关参数
# -----------------------------
# model calibration parameters
calibration_parameters:

  # 模型量化的参考图像的存放目录,图片格式支持Jpeg、Bmp等格式,输入的图片
  # 应该是使用的典型场景,一般是从测试集中选择20~100张图片,另外输入
  # 的图片要覆盖典型场景,不要是偏僻场景,如过曝光、饱和、模糊、纯黑、纯白等图片
  # 若有多个输入节点, 则应使用';'进行分隔
  # -------------------------------------------------------------------------------------------------
  # the directory where reference images of model quantization are stored
  # image formats include JPEG, BMP etc.
  # should be classic application scenarios, usually 20~100 images are picked out from test datasets
  # in addition, note that input images should cover typical scenarios
  # and try to avoid those overexposed, oversaturated, vague,
  # pure blank or pure white images
  # use ';' to seperate when there are multiple input nodes
  # 请根据 02_preprocess.sh 脚本中的文件夹路径来配置
  cal_data_dir: ''
  # cal_data_dir: './calibration_data_yuv_f32'

  # 校准数据二进制文件的数据存储类型,可选值为:float32, uint8
  # calibration data binary file save type, available options: float32, uint8
  # 保持默认,一般情况下都是float32数据,若非float32数据,请配置uint8
  cal_data_type: 'float32'

  # 如果输入的图片文件尺寸和模型训练的尺寸不一致时,并且preprocess_on为true,
  # 则将采用默认预处理方法(skimage resize),
  # 将输入图片缩放或者裁减到指定尺寸,否则,需要用户提前把图片处理为训练时的尺寸
  # ---------------------------------------------------------------------------------
  # In case the size of input image file is different from that of in model training
  # and that preprocess_on is set to True,
  # shall the default preprocess method(skimage resize) be used
  # i.e., to resize or crop input image into specified size
  # otherwise user must keep image size as that of in training in advance
  # preprocess_on: False

  # 模型量化的算法类型,支持kl、max、default、load,通常采用default即可满足要求, 若为QAT导出的模型, 则应选择load
  # ----------------------------------------------------------------------------------
  # types of model quantization algorithms, usually default will meet the need
  # available options:kl, max, default and load
  # if converted model is quanti model exported from QAT , then choose `load`
  # 保持默认
  calibration_type: 'default'

  # 该参数为'max'校准方法的参数,用以调整'max'校准的截取点。此参数仅在calibration_type为'max'时有效。
  # 该参数取值范围:0.0 ~ 1.0。常用配置选项有:0.99999/0.99995/0.99990/0.99950/0.99900。
  # ------------------------------------------------------------------------------------------------
  # this is the parameter of the 'max' calibration method and it is used for adjusting the intercept point of the 'max' calibration.
  # this parameter will only become valid when the calibration_type is specified as 'max'.
  # RANGE: 0.0 - 1.0. Typical options includes: 0.99999/0.99995/0.99990/0.99950/0.99900.
  # max_percentile: 0.99996

# 编译器相关参数
# ----------------------------
# compiler related parameters
compiler_parameters:

  # 编译策略,支持bandwidth和latency两种优化模式;
  # bandwidth以优化ddr的访问带宽为目标;
  # latency以优化推理时间为目标
  # -------------------------------------------------------------------------------------------
  # compilation strategy, there are 2 available optimization modes: 'bandwidth' and 'lantency'
  # the 'bandwidth' mode aims to optimize ddr access bandwidth
  # while the 'lantency' mode aims to optimize inference duration
  # 保持默认
  compile_mode: 'latency'

  # 设置debug为True将打开编译器的debug模式,能够输出性能仿真的相关信息,如帧率、DDR带宽占用等
  # -----------------------------------------------------------------------------------
  # the compiler's debug mode will be enabled by setting to True
  # this will dump performance simulation related information
  # such as: frame rate, DDR bandwidth usage etc.
  # 保持默认
  debug: False

  # 编译模型指定核数,不指定默认编译单核模型, 若编译双核模型,将下边注释打开即可
  # -------------------------------------------------------------------------------------
  # specifies number of cores to be used in model compilation
  # as default, single core is used as this value left blank
  # please delete the "# " below to enable dual-core mode when compiling dual-core model
  # core_num: 2

  # 优化等级可选范围为O0~O3
  # O0不做任何优化, 编译速度最快,优化程度最低,
  # O1-O3随着优化等级提高,预期编译后的模型的执行速度会更快,但是所需编译时间也会变长。
  # 推荐用O2做最快验证
  # ----------------------------------------------------------------------------------------------------------
  # optimization level ranges between O0~O3
  # O0 indicates that no optimization will be made
  # the faster the compilation, the lower optimization level will be
  # O1-O3: as optimization levels increase gradually, model execution, after compilation, shall become faster
  # while compilation will be prolonged
  # it is recommended to use O2 for fastest verification
  # 保持默认
  optimize_level: 'O3'
onnx模型量化yaml文件模板
请新建 onnx_config.yaml 文件,并直接拷贝以下内容,填写空白参数位置即可,参数的具体说明请参考PTQ原理及步骤详解章节内容
# Copyright (c) 2020 Horizon Robotics.All Rights Reserved.
#
# The material in this file is confidential and contains trade secrets
# of Horizon Robotics Inc. This is proprietary information owned by
# Horizon Robotics Inc. No part of this work may be disclosed,
# reproduced, copied, transmitted, or used in any way for any purpose,
# without the express written permission of Horizon Robotics Inc.

# 模型转化相关的参数
# ------------------------------------
# model conversion related parameters
model_parameters:
  # Onnx浮点网络数据模型文件
  # ---------------------------------------------------------------------------------------------------------
  # the model file of floating-point Onnx neural network data
  # 请配置需要转换的模型文件相对路径或绝对路径
  onnx_model: ''
  # onnx_model: './horizon_x3_onnx.onnx'

  # 适用BPU架构
  # --------------------------------
  # the applicable BPU architecture
  # 保持默认,不要修改!
  march: "bernoulli2"

  # 指定模型转换过程中是否输出各层的中间结果,如果为True,则输出所有层的中间输出结果,
  # --------------------------------------------------------------------------------------
  # specifies whether or not to dump the intermediate results of all layers in conversion
  # if set to True, then the intermediate results of all layers shall be dumped
  # 保持默认,不要修改!
  layer_out_dump: False

  # 模型转换输出的结果的存放目录
  # -----------------------------------------------------------
  # the directory in which model conversion results are stored
  # 保持默认,可不配置
  working_dir: 'model_output'

  # 模型转换输出的用于上板执行的模型文件的名称前缀
  # -----------------------------------------------------------------------------------------
  # model conversion generated name prefix of those model files used for dev board execution
  # 模型转换后 输出的成果物 名字前缀, 可以根据自身需要配置
  output_model_file_prefix: 'horizon_x3'

# 模型输入相关参数, 若输入多个节点, 则应使用';'进行分隔, 使用默认缺省设置则写None
# ---------------------------------------------------------------------------------
# model input related parameters,
# please use ";" to seperate when inputting multiple nodes,
# please use None for default setting
input_parameters:

  # (选填) 模型输入的节点名称, 此名称应与模型文件中的名称一致, 否则会报错, 不填则会使用模型文件中的节点名称
  # --------------------------------------------------------------------------------------------------------
  # (Optional) node name of model input,
  # it shall be the same as the name of model file, otherwise an error will be reported,
  # the node name of model file will be used when left blank
  # 保持默认,可不配置
  input_name: ""

  # 网络实际执行时,输入给网络的数据格式,包括 nv12/rgb/bgr/yuv444/gray/featuremap,
  # ------------------------------------------------------------------------------------------
  # the data formats to be passed into neural network when actually performing neural network
  # available options: nv12/rgb/bgr/yuv444/gray/featuremap,
  # 此选项为 模型转换后在X3芯片上运行的数据类型,一般建议配置为nv12, 若想使用其他数据类型,请根据自身需要配置
  input_type_rt: ''
  # input_type_rt: 'nv12'

  # 网络实际执行时输入的数据排布, 可选值为 NHWC/NCHW
  # 若input_type_rt配置为nv12,则此处参数不需要配置
  # ------------------------------------------------------------------
  # the data layout formats to be passed into neural network when actually performing neural network, available options: NHWC/NCHW
  # If input_type_rt is configured as nv12, then this parameter does not need to be configured
  input_layout_rt: ''
  #input_layout_rt: '' 若input_type_rt配置为nv12,则此处参数不需要配置
  #input_layout_rt: 'NHWC'

  # 网络训练时输入的数据格式,可选的值为rgb/bgr/gray/featuremap/yuv444
  # --------------------------------------------------------------------
  # the data formats in network training
  # available options: rgb/bgr/gray/featuremap/yuv444
  # 此选项配置来源:原始浮点模型训练框架中所使用训练的数据类型
  input_type_train: ''
  # input_type_train: 'bgr'

  # 网络训练时输入的数据排布, 可选值为 NHWC/NCHW
  # ------------------------------------------------------------------
  # the data layout in network training, available options: NHWC/NCHW
  # 此选项配置来源:原始浮点模型训练框架中所使用训练的数据排布
  input_layout_train: ''
  # input_layout_train: 'NCHW'
  # input_layout_train: 'NHWC'

  # (选填) 模型网络的输入大小, 以'x'分隔, 不填则会使用模型文件中的网络输入大小,否则会覆盖模型文件中输入大小
  # -------------------------------------------------------------------------------------------
  # (Optional)the input size of model network, seperated by 'x'
  # note that the network input size of model file will be used if left blank
  # otherwise it will overwrite the input size of model file
  # 保持默认,可不配置
  input_shape: ''

  # 网络实际执行时,输入给网络的batch_size, 默认值为1
  # ---------------------------------------------------------------------
  # the data batch_size to be passed into neural network when actually performing neural network, default value: 1
  #input_batch: 1

  # 网络输入的预处理方法,主要有以下几种:
  # no_preprocess 不做任何操作,对应的 mean_value  或者 scale_value 都不需要配置!
  # data_mean 减去通道均值mean_value
  # data_scale 对图像像素乘以data_scale系数
  # data_mean_and_scale 减去通道均值后再乘以scale系数,标识下方对应的 mean_value  和 scale_value 都需要配置!
  # -------------------------------------------------------------------------------------------
  # preprocessing methods of network input, available options:
  # 'no_preprocess' indicates that no preprocess will be made
  # 'data_mean' indicates that to minus the channel mean, i.e. mean_value
  # 'data_scale' indicates that image pixels to multiply data_scale ratio
  # 'data_mean_and_scale' indicates that to multiply scale ratio after channel mean is minused
  # 若配置的是data_mean_and_scale,则下面的 mean_value 和 scale_value都必须配置,若norm_type 选择只有data_mean 或者 data_scale,那只用单独配置对应的 mean_value  或者 scale_value即可,并将没有使能的选项注释掉!
  norm_type: ''
  # norm_type: 'data_mean_and_scale'

  # 图像减去的均值, 如果是通道均值,value之间必须用空格分隔
  # --------------------------------------------------------------------------
  # the mean value minused by image
  # note that values must be seperated by space if channel mean value is used
  # 根据norm_type来决定是否需要配置此选项,若norm_type 选择只有data_mean,则只需单独配置此选项并将data_scale注释掉; 反之注释掉此选项!
  mean_value:
  # mean_value: 128.0
  # mean_value: 111.0 109.0 118.0

  # 图像预处理缩放比例,如果是通道缩放比例,value之间必须用空格分隔
  # ---------------------------------------------------------------------------
  # scale value of image preprocess
  # note that values must be seperated by space if channel scale value is used
  # 根据norm_type来决定是否需要配置此选项,若norm_type 选择只有data_scale,则只需单独配置此选项并将data_mean注释掉; 反之注释掉此选项!
  scale_value:
  # scale_value: 0.0078125
  # scale_value: 0.0078125 0.001215 0.003680

# 模型量化相关参数
# -----------------------------
# model calibration parameters
calibration_parameters:

  # 模型量化的参考图像的存放目录,图片格式支持Jpeg、Bmp等格式,输入的图片
  # 应该是使用的典型场景,一般是从测试集中选择20~100张图片,另外输入
  # 的图片要覆盖典型场景,不要是偏僻场景,如过曝光、饱和、模糊、纯黑、纯白等图片
  # 若有多个输入节点, 则应使用';'进行分隔
  # -------------------------------------------------------------------------------------------------
  # the directory where reference images of model quantization are stored
  # image formats include JPEG, BMP etc.
  # should be classic application scenarios, usually 20~100 images are picked out from test datasets
  # in addition, note that input images should cover typical scenarios
  # and try to avoid those overexposed, oversaturated, vague,
  # pure blank or pure white images
  # use ';' to seperate when there are multiple input nodes
  # 请根据 02_preprocess.sh 脚本中的文件夹路径来配置
  cal_data_dir: ''
  # cal_data_dir: './calibration_data_yuv_f32'

  # 校准数据二进制文件的数据存储类型,可选值为:float32, uint8
  # calibration data binary file save type, available options: float32, uint8
  # 保持默认,一般情况下都是float32数据,若非float32数据,请配置uint8
  cal_data_type: 'float32'

  # 如果输入的图片文件尺寸和模型训练的尺寸不一致时,并且preprocess_on为true,
  # 则将采用默认预处理方法(skimage resize),
  # 将输入图片缩放或者裁减到指定尺寸,否则,需要用户提前把图片处理为训练时的尺寸
  # ---------------------------------------------------------------------------------
  # In case the size of input image file is different from that of in model training
  # and that preprocess_on is set to True,
  # shall the default preprocess method(skimage resize) be used
  # i.e., to resize or crop input image into specified size
  # otherwise user must keep image size as that of in training in advance
  # preprocess_on: False

  # 模型量化的算法类型,支持kl、max、default、load,通常采用default即可满足要求, 若为QAT导出的模型, 则应选择load
  # ----------------------------------------------------------------------------------
  # types of model quantization algorithms, usually default will meet the need
  # available options:kl, max, default and load
  # if converted model is quanti model exported from QAT , then choose `load`
  # 保持默认
  calibration_type: 'default'

  # 该参数为'max'校准方法的参数,用以调整'max'校准的截取点。此参数仅在calibration_type为'max'时有效。
  # 该参数取值范围:0.0 ~ 1.0。常用配置选项有:0.99999/0.99995/0.99990/0.99950/0.99900。
  # ------------------------------------------------------------------------------------------------
  # this is the parameter of the 'max' calibration method and it is used for adjusting the intercept point of the 'max' calibration.
  # this parameter will only become valid when the calibration_type is specified as 'max'.
  # RANGE: 0.0 - 1.0. Typical options includes: 0.99999/0.99995/0.99990/0.99950/0.99900.
  # max_percentile: 0.99996

# 编译器相关参数
# ----------------------------
# compiler related parameters
compiler_parameters:

  # 编译策略,支持bandwidth和latency两种优化模式;
  # bandwidth以优化ddr的访问带宽为目标;
  # latency以优化推理时间为目标
  # -------------------------------------------------------------------------------------------
  # compilation strategy, there are 2 available optimization modes: 'bandwidth' and 'lantency'
  # the 'bandwidth' mode aims to optimize ddr access bandwidth
  # while the 'lantency' mode aims to optimize inference duration
  # 保持默认
  compile_mode: 'latency'

  # 设置debug为True将打开编译器的debug模式,能够输出性能仿真的相关信息,如帧率、DDR带宽占用等
  # -----------------------------------------------------------------------------------
  # the compiler's debug mode will be enabled by setting to True
  # this will dump performance simulation related information
  # such as: frame rate, DDR bandwidth usage etc.
  # 保持默认
  debug: False

  # 编译模型指定核数,不指定默认编译单核模型, 若编译双核模型,将下边注释打开即可
  # -------------------------------------------------------------------------------------
  # specifies number of cores to be used in model compilation
  # as default, single core is used as this value left blank
  # please delete the "# " below to enable dual-core mode when compiling dual-core model
  # core_num: 2

  # 优化等级可选范围为O0~O3
  # O0不做任何优化, 编译速度最快,优化程度最低,
  # O1-O3随着优化等级提高,预期编译后的模型的执行速度会更快,但是所需编译时间也会变长。
  # 推荐用O2做最快验证
  # ----------------------------------------------------------------------------------------------------------
  # optimization level ranges between O0~O3
  # O0 indicates that no optimization will be made
  # the faster the compilation, the lower optimization level will be
  # O1-O3: as optimization levels increase gradually, model execution, after compilation, shall become faster
  # while compilation will be prolonged
  # it is recommended to use O2 for fastest verification
  # 保持默认
  optimize_level: 'O3'
8.15.3.4. X3多核BPU使用说明
因X3中有2颗BPU核,所以在BPU使用中存在单核模型和双核模型的情况,多核BPU的使用注意事项参考文档:X3多核BPU的合理使用技巧与建议
8.16. 其他常见问题
8.16.1. 算法运行I2C报错
【现象】 运行AI算法时报以下I2C的错误,是否有问题?
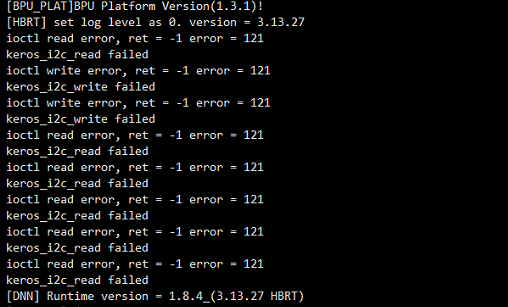
【解答】 没有问题,是找不到算法的加密芯片导致的错误提示,不影响功能。改错误提示在1.0.4之后版本解决。