MIPI图像采集
功能介绍
为实现环境感知能力,机器人产品中通常会搭载摄像头、ToF等类型的传感器。为降低用户传感器适配和使用成本,TogetheROS.Bot会对多种常用传感器进行封装,并抽象成hobot_sensor模块,支持ROS标准图像消息。当配置的传感器参数与接入的摄像头不符时,程序会自动适应正确的传感器类型。目前已支持的MIPI传感器类型如下所示:
| 类型 | 型号 | 规格 |
|---|---|---|
| 摄像头 | F37 | 200W |
| 摄像头 | GC4663 | 400W |
| 摄像头 | IMX219 | 200W |
| 摄像头 | IMX477 | 200W |
| 摄像头 | OV5647 | 200W |
支持平台
| 平台 | 运行方式 | 示例功能 |
|---|---|---|
| 旭日X3派 | Ubuntu 20.04 | 启动MIPI摄像头,并通过Web展示图像 |
准备工作
旭日X3派
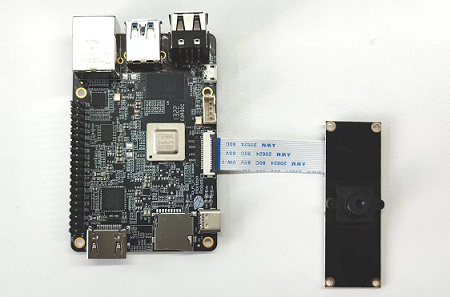
确认摄像头正确接入旭日X3派,例如 F37 摄像头的接入方式如下图:
旭日X3派已烧录好地平线提供的Ubuntu 20.04系统镜像
旭日X3派已成功安装tros.b
确认PC机能够通过网络访问旭日X3派
使用方式
X3平台
下面以 F37 为例,介绍摄像头数据获取和预览的方法:
通过 SSH 登录旭日X3派,打开
/opt/tros/share/mipi_cam/launch/mipi_cam.launch.py,修改video_device字段配置摄像头型号,这里设置摄像头型号为F37;修改camera_calibration_file_path字段为/opt/tros/lib/mipi_cam/config/F37_calibration.yaml,设置相机标定文件的读取路径,这里设置标定文件为/opt/tros/lib/mipi_cam/config/F37_calibration.yamlfrom launch import LaunchDescription from launch_ros.actions import Node def generate_launch_description(): return LaunchDescription([ # 启动图片发布pkg Node( package='mipi_cam', executable='mipi_cam', output='screen', parameters=[ {"camera_calibration_file_path": "/opt/tros/lib/mipi_cam/config/F37_calibration.yaml"}, {"out_format": "nv12"}, {"image_width": 960}, {"image_height": 544}, {"io_method": "shared_mem"}, {"video_device": "F37"} ], arguments=['--ros-args', '--log-level', 'error'] ) ])
并通过下述命令启动 hobot_sensor 节点
# 配置 tros.b 环境:
source /opt/tros/local_setup.bash
# launch 方式启动
ros2 launch mipi_cam mipi_cam.launch.py
如程序输出如下信息,说明节点已成功启动
[INFO] [launch]: All log files can be found below /root/.ros/log/2022-06-11-15-16-13-641715-ubuntu-8852
[INFO] [launch]: Default logging verbosity is set to INFO
[INFO] [mipi_cam-1]: process started with pid [8854]
...
Web端查看 F37 摄像头图像,由于发布原始数据,需要编码JPEG图像,另起两个终端:一个进行订阅 MIPI 数据编码为JPEG,一个用webservice发布
# 一个终端编码
source /opt/tros/local_setup.bash
ros2 run hobot_codec hobot_codec_republish --ros-args -p channel:=1 -p in_mode:=shared_mem -p in_format:=nv12 -p out_mode:=ros -p out_format:=jpeg -p sub_topic:=/hbmem_img -p pub_topic:=/image_jpeg

# 再起一个终端
source /opt/tros/local_setup.bash
# 启动webservice
ros2 launch websocket hobot_websocket_service.launch.py
# 启动websocket
ros2 run websocket websocket --ros-args -p image_topic:=/image_jpeg -p image_type:=mjpeg -p only_show_image:=true
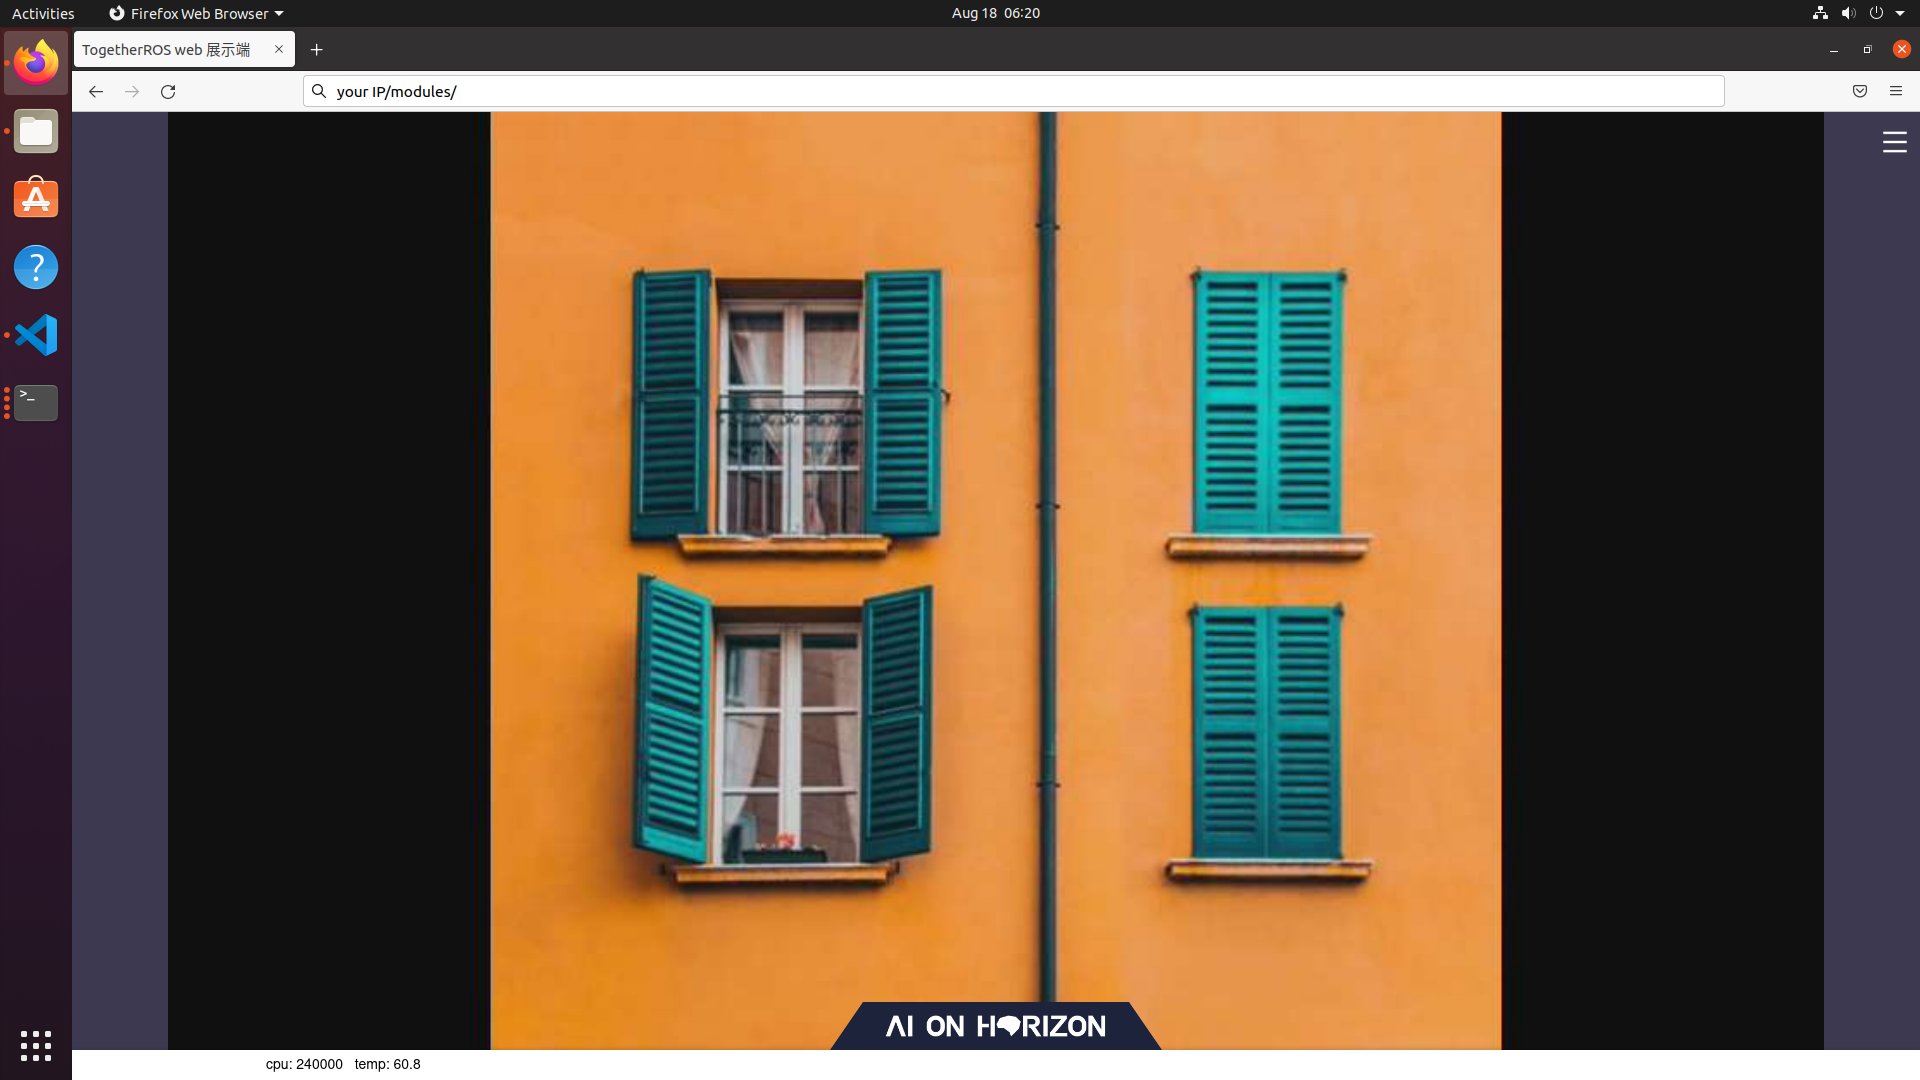
PC打开浏览器(chrome/firefox/edge)输入http://IP:8000(IP为旭日X3派IP地址),点击左上方Web端展示即可看到F37输出的实时画面
在PC机上查询相机内参(具体数据以读取的相机标定文件为准),命令及结果如下:
root@ubuntu:~# source /opt/ros/foxy/local_setup.bash
root@ubuntu:~# ros2 topic echo /camera_info
    header:
stamp:
    sec: 1662013622
    nanosec: 672922214
frame_id: default_cam
height: 1080
width: 1920
distortion_model: plumb_bob
d:
- 0.169978
- -0.697303
- -0.002944
- -0.004961
- 0.0
k:
- 1726.597634
- 0.0
- 904.979671
- 0.0
- 1737.359551
- 529.123375
- 0.0
- 0.0
- 1.0
r:
- 1.0
- 0.0
- 0.0
- 0.0
- 1.0
- 0.0
- 0.0
- 0.0
- 1.0
p:
- 1685.497559
- 0.0
- 881.6396
- 0.0
- 0.0
- 1756.460205
- 526.781147
- 0.0
- 0.0
- 0.0
- 1.0
- 0.0
binning_x: 0
binning_y: 0
roi:
x_offset: 0
y_offset: 0
height: 0
width: 0
do_rectify: false
注意事项
mipi_cam提供F37以及GC4663两种摄像头的标定文件,默认读取F37的标定文件
F37_calibration.yaml,如使用GC4663,请更改相机标定文件的读取路径,具体步骤如下:# 配置 tros.b 环境: source /opt/tros/local_setup.bash # 打开/opt/tros/share/mipi_cam/launch/mipi_cam.launch.py,修改camera_calibration_file_path字段为/opt/tros/lib/mipi_cam/config/GC4663_calibration.yaml # launch 方式启动 ros2 launch mipi_cam mipi_cam.launch.py
摄像头插拔注意事项
严禁在开发板未断电的情况下插拔摄像头,否则非常容易烧坏摄像头模组。
如遇到hobot_sensor节点启动异常,可通过下述步骤进行问题排查:
检查硬件连接
是否设置 tros.b 环境
参数是否正确,具体参考 Hobot_Sensors README.md